Office 365 is one of the best email application by which one can send and receive messages from any time and anywhere. The suite allows to manage several applications from a single account and all this is possible because of the cloud-based platform. Another advantage of Office 365 is it can be accessed from laptops, computers, Android phones, tablets and other devices. You can either install it directly or add the Office 365 account via Admin Center.
The Admin center provides a graphical user interface that makes it easy to add the Office 365 account. So check out the steps to configure Office 365 account via Admin center and activate it. But before that make sure you have all the permissions to make changes to the mailbox and modify settings. You may require administrative privileges for adding Office 365 account.
Add Office 365 Account Via Admin Center
- Sign in to Office 365 Administrator account
- When you sign in, the Office 365 admin dashboard will open
- On Office 365, click on Admin and a new window will open

- Now browse to Users then click on Active Users and select Add a new user
- A new window will open enter the details for the user for which you want to create account
- Enter the first name, last name, display name and Office 365 username
- You can select the option to generate password or choose the option to prompt for password on first login
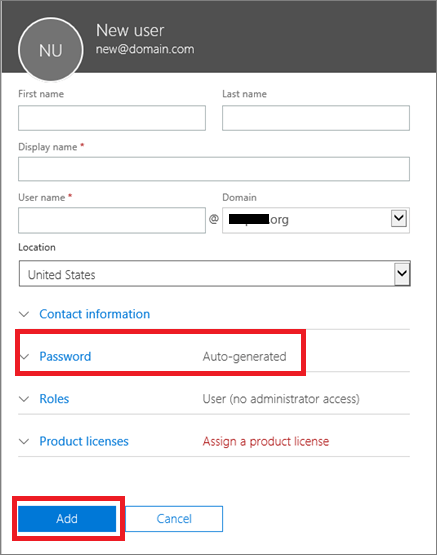
- Now click on the Add button and then a new user will be created
- The user will be asked to enter the password on first login, in this way you can add the Office 365 account.
Another method to add Office 365 account is via PowerShell method. The PowerShell method requires certain permissions to add the Office 365 account
Create Office 365 Account Via PowerShell
Prerequisites before adding the Office 365 account are
- Global Admin role to Office 365 account
- .NET Framework 4.5 and Windows Management Framework 4.0
- Install Microsoft Online Services Sign-in Assistance
If all the requirements are met and there is no problem in admin permissions, then start to add Office 365 account via PowerShell by following steps
- Go to Start and type Windows PowerShell
- Right click on the icon that appears and selects Run as Administrator
- When the command prompt opens install Azure Active Directory and MSOnline Module
Type the command
Install-Module –Name Azure AD

Install-Module
–Name MSOnline
- The next step is to connect Office 365 to Cloud by following command
$Credential = Get-Credential

$O365 = New-PSSession

-Configuration Name Microsoft. Exchange -Connection Uri

https://outlook.office365.com/powershell-liveid/ -Credential $Cred

-Authentication Basic -Allow Redirection
- Now Assign PS Session to the Office 365 account
Import-PSSession $O365
- The next step is to connect PowerShell to online services
Connect-MsolService –Credential

$O365
- Check the connection verification whether you are connected or not by following command
Get-msoluser
- If you are connected then the mailbox list will appear else the MSolService will show the error message
- Now when the mailbox list appear create new user in Office 365 by the following command
New-MsolUser -UserPrincipalName

Ram@officemigration.onmicrosoft.com.onmicrosoft.com -DisplayName "Ram Shyam" -FirstName “ram” -LastName “shyam”
- It will auto-generate the password after creating the account. The password can be changed by following command
Set-MsolUserPassword

–UserPrincipalNameh ram@ officemigration.onmicrosoft.com -NewPassword myP@S$rd
The Office 365 account will be created. In this way you can easily add the Office 365 account via PowerShell method or via Admin Center. So create the Office 365 mailbox and start using it.