The Exchange environment consists of several types of mailboxes. Users having account on Exchange Server usually get the basic type of mailbox i.e. User Mailbox. Emails, attachments, contacts, calendar, all data is stored in mailbox same as that in Outlook. However, Exchange offers other mailbox services too and migrating from one mailbox to another can be done by set-commands. So, to convert user mailbox to shared mailbox in Exchange try the management shell.
You must be wondering what the other mailboxes than user mailbox are, then Exchange server gives its user access to Share Mailbox, Room Mailbox and Equipment Mailbox. Depending upon the usage and job role Administrator can assign mailboxes to users and even convert one mailbox to another. Exchange server Administrator can use Shell Commands to export data.
Exchange Mailbox Conversion Methods
Migration of data is possible among
- User mailbox to Shared mailbox
- Shared mailbox to User mailbox
- Shared mailbox to Room mailbox
- Shared mailbox to Equipment mailbox
- Equipment mailbox to Shared mailbox
- Room mailbox to shared mailbox
So apart from conversion of User Mailbox to Shared Mailbox in Exchange, these migration methods are also supported.
Types of Exchange Mailboxes
Above, we brief about Exchange server mailboxes, here is the detailed explanation
User Mailbox
This type of mailbox function same as that of Outlook. The most basic type of Exchange mailbox, it stores the data and helps in email communication to send/ receive email messages, schedule meetings, add, delete, modify contacts, and store other email related items. Every user has a specific user mailbox
Shared Mailbox
As the name goes it is shared by multiple users, so it is a single mailbox with several individuals working on it. There is not a specific account to Shared Mailbox. The Exchange Server administrator create the Shared mailbox and add users so they can use it for their purpose.
Room Mailbox
Room mailbox is created to use the Physical location of the organization for meetings like conference rooms, meeting rooms, auditoriums, departmental staff meetings and training rooms. User can reserve these rooms by room mailboxes in meeting requests.
Equipment Mailbox
Users under this mailbox can use the portable resource that is assigned to mailbox like project, microphone, laptops, cars and other entities.
How to Convert Mailbox Type with Exchange Management Shell
In order to Convert both Mailbox and its password use the given code
Set-Mailbox -Identity <MailboxIdentity> -Type <Regular | Room | Equipment | Shared> [-Password (ConvertTo-SecureString -String ‘<Password>’ -AsPlainText -Force)] [-EnableRoomMailboxAccount <$true | $false> [-RoomMailboxPassword (ConvertTo-SecureString -String ‘<Password>’ -AsPlainText -Force)] [-ResetPasswordOnNextLogon <$true | $false>]
This is the syntax for mailbox conversion. Taking an example
Set-Mailbox -Identity “DB02222” -Type Shared [-Password (ConvertTo-SecureString – String ‘98765’)] [-ResetPasswordOnNextLogon <$true>]
To convert User Mailbox only use
Set-Mailbox -Identity “DB92458673” -Type Shared
This will convert the mailbox with identity DB92458673 to shared mailbox.
Convert User Mailbox to Shared Mailbox with Exchange Admin Center
If you are facing any problem in cmdlets then try the Microsoft EAC method. You must have Admin privilege for this method
- Go to Microsoft 365 Admin center and sign in with username and password
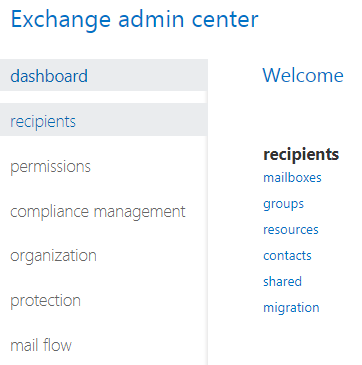
- On the left side expand the Admin Center option and click on Exchange
- The Exchange dashboard will open, click on Recipients tab and then mailboxes
- Select the user mailbox you want to convert
- On the left-hand side, there is an option ‘Convert to Shared Mailbox’

- Click on ‘Convert’ option, the user mailbox will be added to Shared mailboxes.
So, these are the two methods by which a User mailbox can be moved to Shared Mailbox.