Summary: Easy step-by-step guide to convert Windows Live Mail to PST format using manual methods for free. When a user wants to migrate away from the Windows Live email client to Outlook, the EML file which stores Windows Live mail data is converted to the PST format of MS Outlook.
Although MS Outlook is one of the finest and most preferred email clients among users worldwide, There are a few other email clients as well which are used by a number of users Windows Live Mail was one of them as it is discontinued now. While Windows Live Mail stores emails and user information in EML files MS Outlook uses PST files, Therefore emails created with one program do not synchronize automatically with another client. Today, in this article I will tell you how to export emails from Windows Live Mail to Outlook PST format.
Automatic Solution

Download SystoolsWindows Live Mail Converter
Before you start the process to export Windows Live Mail to PST you must ensure that MS Outlook is installed on your system with the user profile created.
Steps to Convert Windows Live Mail To PST
The following steps must be followed carefully to move your emails from Windows Live Mail to Outlook 2019
- Open MS Outlook and Windows Live Mail
- Go to Windows Live Mail and click on File
- Go to Export>>Email Messages and select Microsoft Exchange

- Click on Next. The Windows Live Mail Export box will open
- Choose the option between Microsoft Exchange and Microsoft Windows Live Mail in which you want to export email to>>Next

- A dialog box will appear with the message This will export messages from Windows Mail to Microsoft Outlook>>click OK.
- Now select mail folders which you want to export, you can either select All folders option or Selected folders.

- After that click on Finish
- After successful completion of the process, a message box will appear for messages successfully exported
Note: The time taken by the Export process depends on the number of emails you are exporting.
How to Export Contacts from Windows Live Mail to Outlook 2019
- In Windows Live Mail Click on Contacts > Export and Select CSV(comma-separated values
- Now on the CSV export window Click on browse and now select the Desktop folder.

- Type the name WLMContactsin the file name and press Save
- Press the Next button to select the fields Now press Finish
After the Export is completed you can close the Windows Live Mail window, Now you have to import the contacts to MS Outlook. - Open MS Outlook.
- Go to Contacts >File, select Open, and now click on Import.
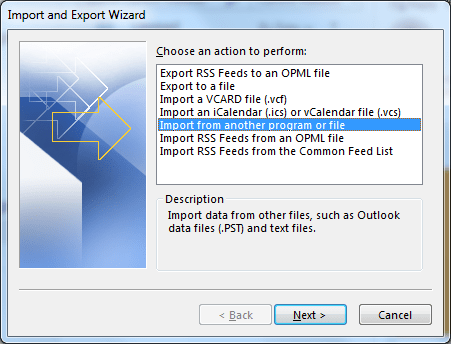
- Now select the option “Import from another program or file” and click Next.
- Select “Comma Separated Values (Windows)” and click
- click browse to select the file WLMContacts then click Open.
- Now click Next and then Finish
In this way, the windows contacts can be exported to outlook. As you have seen manual method is time-consuming as it includes several steps, moreover the data migrated may not be the same as it was original.
These discrepancies can be avoided with third-party tools, Stellar Windows Live Mail to Outlook converter is one such tool. It migrates the mailbox folders to Outlook PST smoothly. Using Stellar Windows Live Mail to PST converter is extremely easy, In just a few clicks you would be able to convert Windows Live Mail to PST format. Check out the process to export Windows Mail to Outlook with Stellar Windows Live Mail Converter.
Convert Windows Live Mail To PST With Stellar Windows Live Mail Converter
- Download the Systools Converter for Windows Live Mail from Here
- Install and run the software on the computer.
- On the home screen, Click on “Select Identity” and select the WLM file to convert Windows Live Mail profiles into Outlook PST files.
- Scanning of mailbox items is performed by the software
- Preview the EML files, find/ sort the files and proceed next
- Select the option to create a new PST file or add it to the existing file. It is recommended to create a new pst file
- Click on the ‘Save’ button to start EML to PST conversion
- The converted file will be stored in a new folder
- Use this file to add to the Outlook profile
Just a few easy steps and all Windows mail data will be imported to Outlook. The tool maintains the email formatting and saves details in the log report.